three.js Animation System
This note is based on DISCOVER three.js, mostly excerpts with some personal understanding
Basic Introduction
The three.js animation system is a complete animation mixing desk. Using this system, you can animate almost any aspect of objects, such as position, scale, rotation, material color or opacity, skinned mesh bones, morph targets, and much more.
The animation system uses keyframes to define animations. To create an animation, we set keyframes at specific time points, and then the animation system fills in the blanks for us using a process called tweening.
Keyframes
Each keyframe consists of three pieces of information: time time, property property, and value value, for example:
- At 0 seconds
.positionis (0,0,0). - At 3 seconds
.scaleis (1,1,1). - At 12 seconds
.material.coloris red.
The animation system supports five data types.
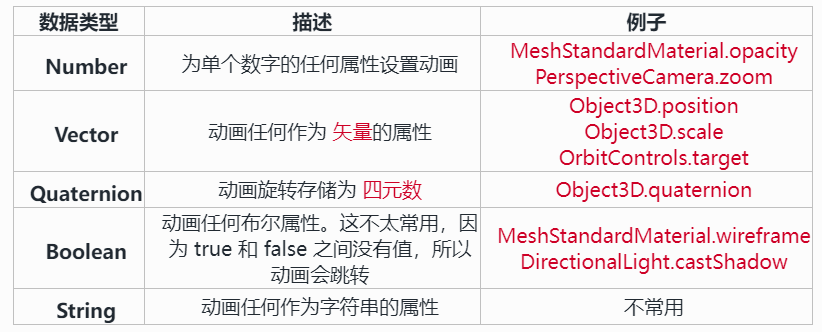
Notably absent from this list is Euler angles, which, if you recall from our chapter on transformations, is similar to vectors and used to store rotations in
Object3D.rotation. To animate rotations, you must useObject3D.quaternion.
KeyframeTrack
Keyframes are raw data stored in two arrays, time and values, in a KeyframeTrack.
KeyframeTrack is the base class, with a subclass for each data type:
NumberKeyframeTrackVectorKeyframeTrackQuaternionKeyframeTrackBooleanKeyframeTrackStringKeyframeTrack
We never use KeyframeTrack directly. Instead, we'll choose whichever subclass matches the animation data type.
Create a number keyframe track representing opacity, containing five keyframes:
import { NumberKeyframeTrack } from "three";

const times = [0, 1, 2, 3, 4];
const values = [0, 1, 0, 1, 0];

const opacityKF = new NumberKeyframeTrack(".material.opacity", times, values);
AnimationClip
These 53 tracks together create the animation, which we call an animation clip. So, an animation clip is a collection of any number of keyframes attached to a single object, and the class representing the clip is AnimationClip. From here on, we'll simply refer to animation clips as clips. Animation clips can loop, so while this dancer's animation is 18 seconds long, when it reaches the end, it loops back, and the dancer dances forever.

Let's create a clip containing the single position track from earlier:
import { AnimationClip, VectorKeyframeTrack } from "three";

const times = [0, 3, 6];
const values = [0, 0, 0, 2, 2, 2, 0, 0, 0];

const positionKF = new VectorKeyframeTrack(".position", times, values);

// just one track for now
const tracks = [positionKF];

// use -1 to automatically calculate
// the length from the array of tracks
const length = -1;

const clip = new AnimationClip("slowmove", length, tracks);
AnimationMixer
To animate an object like a mesh using the animation system, we must connect it to an AnimationMixer. We need one mixer for each animated object in the scene. The mixer performs the technical work of moving the model through time according to the animation clip, whether moving a dancer's feet, arms, and hips, or a bird's wings.
import { Mesh, AnimationMixer } from 'three';

// create a normal, static mesh
const mesh = new Mesh();

// turn it into an animated mesh by connecting it to a mixer
const mixer = new AnimationMixer(mesh);
We also need to update the mixer in each frame
AnimationAction
AnimationAction connects the animated object to the animation clip. The class AnimationAction is also where controls like pause, play, loop, and reset are located. Unlike other animation system classes, we never create actions directly. Instead, we'll use AnimationMixer.clipAction, which ensures actions are cached by the mixer.
Creating an AnimationAction using .clipAction:
import { AnimationClip, AnimationMixer } from "three";

const moveBlinkClip = new AnimationClip("move-n-blink", -1, [
  positionKF,
  opacityKF,
]);

const mixer = new AnimationMixer(mesh);
const action = mixer.clipAction(moveBlinkClip);
Create an action then set its state to playing:
const mixer = new AnimationMixer(humanModel);

const action = mixer.clipAction(walkClip);

// immediately set the animation to play
action.play();

// later, you can stop the action
action.stop();
Note that while we called .play, the animation hasn't started yet. We still need to update the mixer in the animation loop, which we'll do later.
Suppose this character can also run and jump. Each animation will be in a separate clip, and each clip must be connected to an action. So just as there's a one-to-one relationship between mixer and model, there's also a one-to-one relationship between actions and animation clips.
const mixer = new AnimationMixer(humanModel);

const walkAction = mixer.clipAction(walkClip);
const runAction = mixer.clipAction(runClip);
const jumpAction = mixer.clipAction(jumpClip);
The next step is to choose which of these actions to play. How you handle these will depend on what kind of scene you're building. For example, if it's a game, you'd connect these actions to user controls so that when the corresponding button is pressed, the character walks, runs, or jumps. On the other hand, if it's a non-playable character, you could connect them to an AI system and let it control the character's actions.
Updating Animation in the Loop
There's only one thing left to do before playing any animation. We need to update the animated object in the animation loop. The mixer has an update method that takes a time delta parameter. However much time we pass to mixer.update, all actions connected to the mixer will move forward that amount of time.
const mixer = new AnimationMixer(mesh);
const clock = new Clock();

// you must do this every frame
const delta = clock.getDelta();
mixer.update(delta);const mixer = new AnimationMixer(mesh);
mesh.tick = (delta) => mixer.update(delta);
updatables.push(mesh);setupModel.js
import { AnimationMixer } from 'three';

function setupModel(data) {
  const model = data.scene.children[0];
  const clip = data.animations[0];

  const mixer = new AnimationMixer(model);
  const action = mixer.clipAction(clip);
  action.play();

  model.tick = (delta) => mixer.update(delta);

  return model;
}

export { setupModel };
World.js
import { loadBirds } from './components/birds/birds.js';
import { createCamera } from './components/camera.js';
import { createLights } from './components/lights.js';
import { createScene } from './components/scene.js';

import { createControls } from './systems/controls.js';
import { createRenderer } from './systems/renderer.js';
import { Resizer } from './systems/Resizer.js';
import { Loop } from './systems/Loop.js';

let camera;
let controls;
let renderer;
let scene;
let loop;

class World {
  constructor(container) {
    camera = createCamera();
    renderer = createRenderer();
    scene = createScene();
    loop = new Loop(camera, scene, renderer);
    container.append(renderer.domElement);
    controls = createControls(camera, renderer.domElement);

    const { ambientLight, mainLight } = createLights();

    loop.updatables.push(controls);
    scene.add(ambientLight, mainLight);

    const resizer = new Resizer(container, camera, renderer);
  }

  async init() {
    const { parrot, flamingo, stork } = await loadBirds();

    // move the target to the center of the front bird
    controls.target.copy(parrot.position);

    loop.updatables.push(parrot, flamingo, stork);
    scene.add(parrot, flamingo, stork);
  }

  render() {
    renderer.render(scene, camera);
  }

  start() {
    loop.start();
  }

  stop() {
    loop.stop();
  }
}

export { World };